ShopDreamUp AI ArtDreamUp
Deviation Actions


Suggested Deviants


Suggested Collections


You Might Like…


Featured in Groups


Description
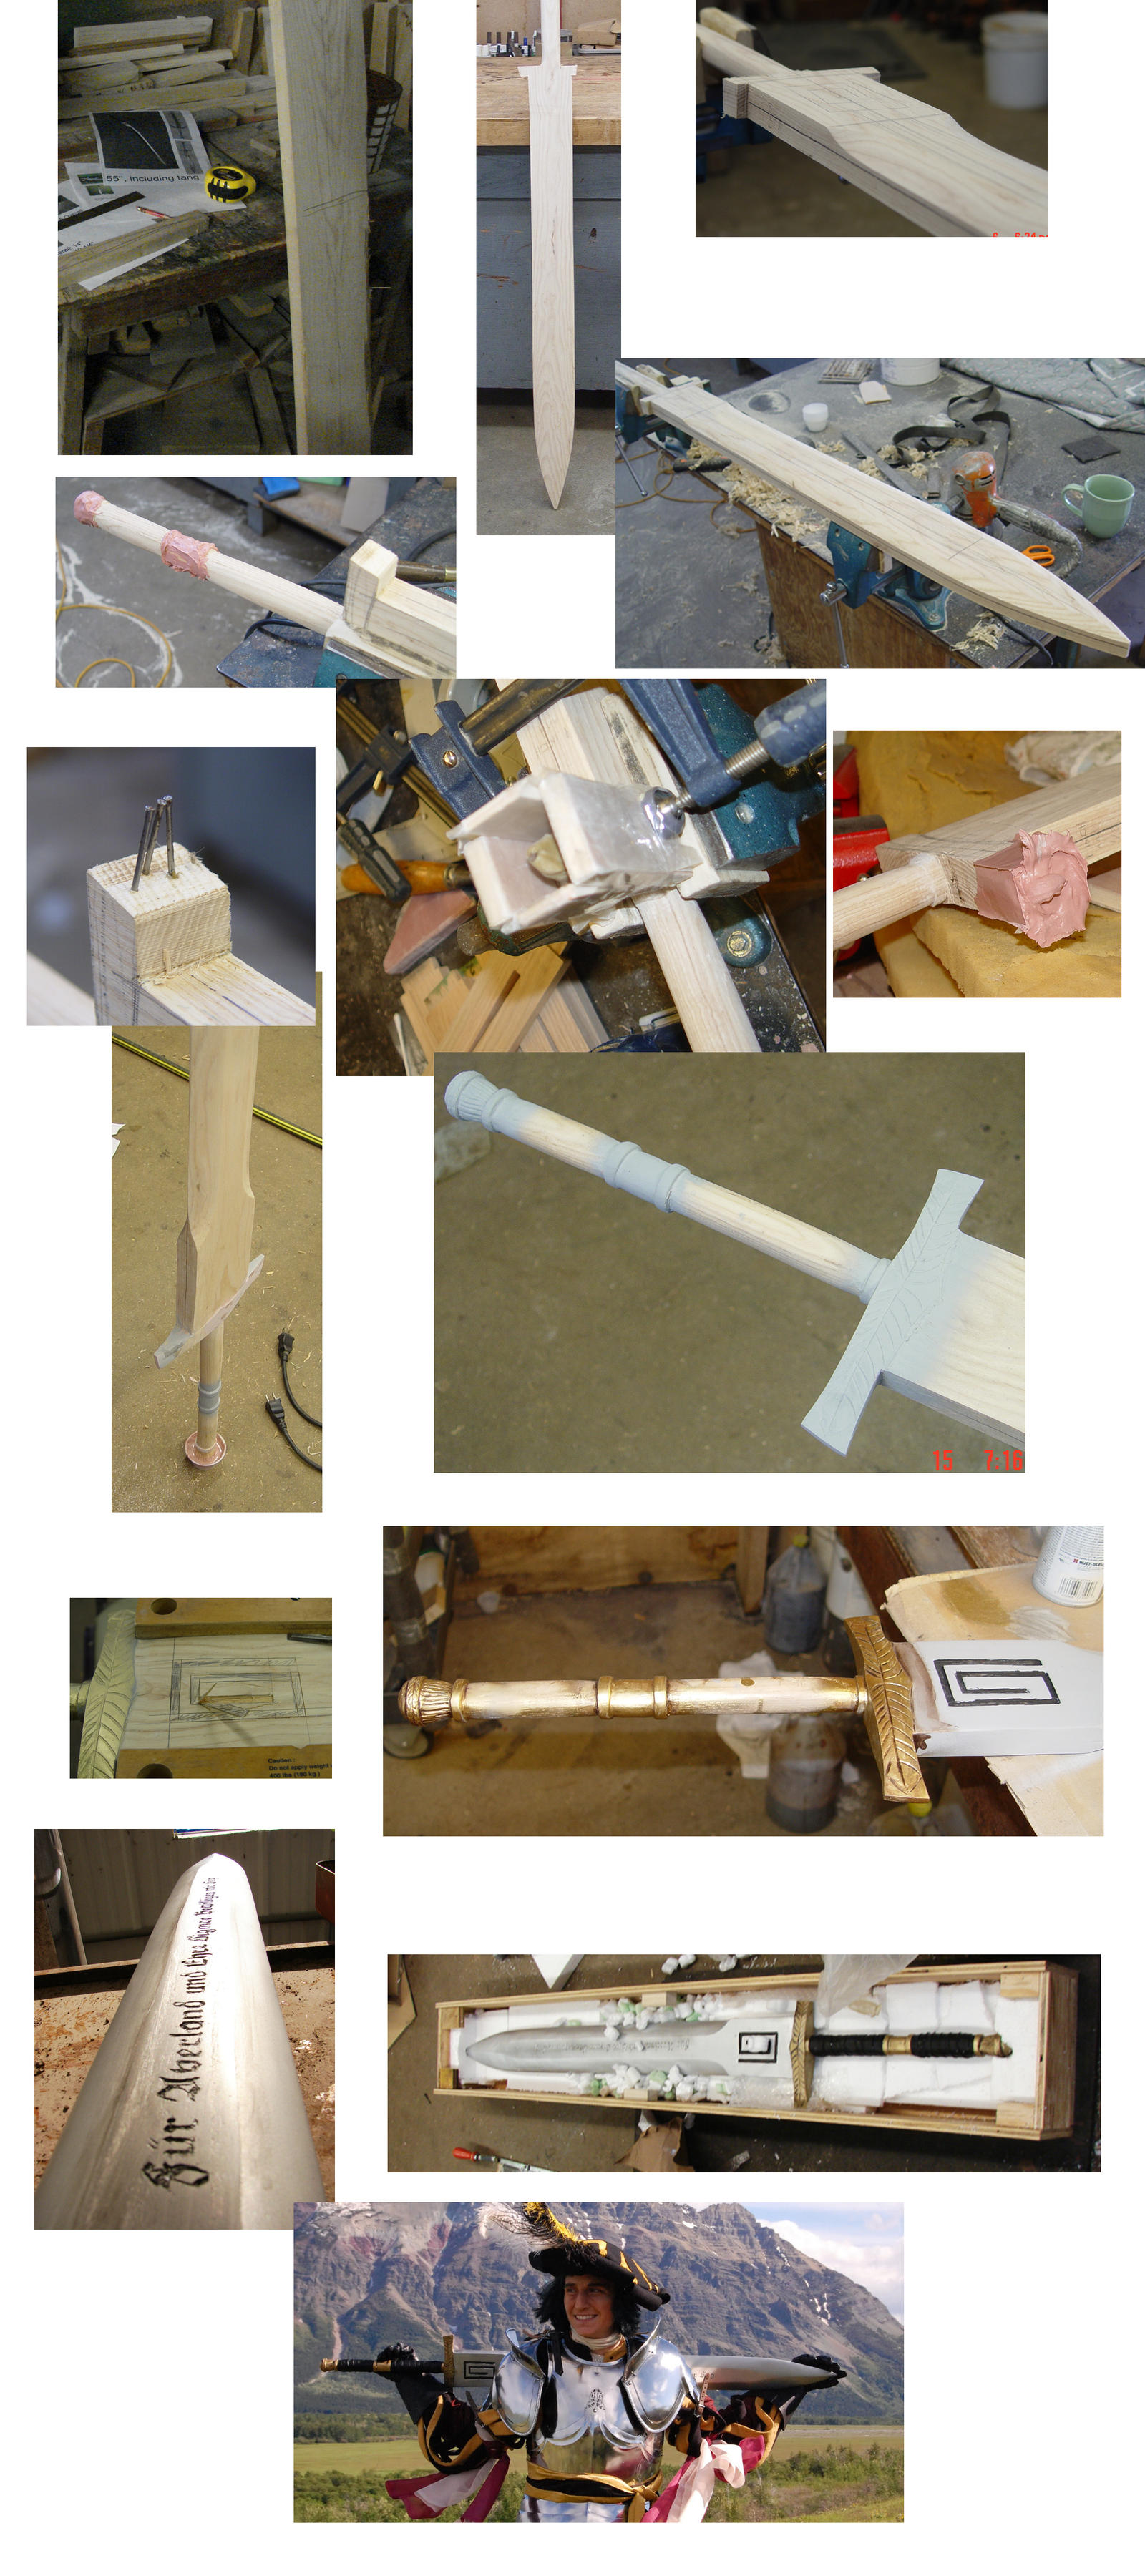
The unbelievably oversized Runefang for Elector Count Marius Leitdorf, part of the Warhammer Fantasy.
Part of a commission for the epically awesomely :iconcolonellianross: And final images of blade with owner, are of and are shared with vewwy nice permisshy by ~ColonelLiamRoss as well.
 < Click on this image for the full character story behind this piece. Truly a fun experience creating something so over-the-top off several ideas.
I'll be happier to create a more detailed tutorial if requested, but the most important steps are outlined here;
~Get a board, I used ash, It's clean, nice weight and not too porous.
~ Make your centers and middles, and cut out the blade size. Over-sized, naturally, you have much cleaning and sculpting to do. I used a rough disk sander/scaler and a large belt sander to do the bulk of the 'grunt' work for the blade. I also do it by eye. (I have the tools, I have the talent.)
~ For the pommel, cross guards, grips, I used Bondo. Reinforce and protruding details with nails, and you may need to build plywood frames/boxes (lined with wax paper!!!) to build out with your Bondo. And a Dixie cup is the best way to make a pommel, once filled with Bondo. (Wink)")
~Dremel and etch the details.
~The grey paint is KRYLON AUTO BODY PRIMER. It's in the same Holy Church as Bondo, get it and love it. It fills in scratches and grooves, can be sanded between coats, and takes all kinds of finishes. I love it.
~ Paint, antique, laquer, fuss over the colours more. Repeat cycle. Rinse.
~ Pack in a sturdy crate.
~Hope all you props get to exist in such a gorgeous place with such a kick ass owner.
Hope this helps!

Seen in rawer format

Quicks links to my;
~Costumes and props
~Tutorials for crafting
~Original Fantasy Artworks
 Zazzle Store
 Redbubble and Bubblesite profiles
 Cafepress Store
  DA prints
 <a href="[link]>FlickR profile
Eye Fetch gallery
Part of a commission for the epically awesomely :iconcolonellianross: And final images of blade with owner, are of and are shared with vewwy nice permisshy by ~ColonelLiamRoss as well.
< Click on this image for the full character story behind this piece. Truly a fun experience creating something so over-the-top off several ideas. I'll be happier to create a more detailed tutorial if requested, but the most important steps are outlined here;
~Get a board, I used ash, It's clean, nice weight and not too porous.
~ Make your centers and middles, and cut out the blade size. Over-sized, naturally, you have much cleaning and sculpting to do. I used a rough disk sander/scaler and a large belt sander to do the bulk of the 'grunt' work for the blade. I also do it by eye. (I have the tools, I have the talent.)
~ For the pommel, cross guards, grips, I used Bondo. Reinforce and protruding details with nails, and you may need to build plywood frames/boxes (lined with wax paper!!!) to build out with your Bondo. And a Dixie cup is the best way to make a pommel, once filled with Bondo.
~Dremel and etch the details.
~The grey paint is KRYLON AUTO BODY PRIMER. It's in the same Holy Church as Bondo, get it and love it. It fills in scratches and grooves, can be sanded between coats, and takes all kinds of finishes. I love it.
~ Paint, antique, laquer, fuss over the colours more. Repeat cycle. Rinse.
~ Pack in a sturdy crate.
~Hope all you props get to exist in such a gorgeous place with such a kick ass owner.
Hope this helps!
Seen in rawer format
Quicks links to my;
~Costumes and props
~Tutorials for crafting
~Original Fantasy Artworks
Eye Fetch gallery
Image size
2000x4500px 4.08 MB
© 2011 - 2024 InKibus
Comments14
Join the community to add your comment. Already a deviant? Log In
Very interesting process here.
I like the fact that you have taken a piece of wood and turned it into a piece of "Metal". The portions of the design that stand out for me are the guard, pommel and "turned" handle areas.
I think that the reason they stand out for me is that you have created them out of filler material. As such they took the paint in a much more realistic fashion and really look like metal.
If I have any major issue with the piece it is how you prepped for the blade area. Since you are familiar with Krylon Auto Body primer (ONE OF THE BEST!!!) I can skip the notes about finding a good primer. I do think that you would have gotten a much smoother and more realistic finish if you had applied 5 or 6 coats of primer and sanded with progressively finer grades of sand paper between. To get a truly smooth finish I take things all the way up to 600 grit wet sand sand paper for the final surfacing application before the final prime coat. You may also want to look into a product called "Red Lead". It is another auto body finishing product that is designed to fill very small digits and the like. It required no mixing (YAY!) and dries very quickly if it is applied in a very thin fashion. Great stuff that is.
Now, for an explanation of the scores:
Vision gets full marks. Being able to take an actual item of unknown material and realize it in something that you can work with requires a good deal of creativity. I think you have done a wonderful job with the process here.
Originality does not get full marks because you are not creating an item completely from your imagination (Yes it's a commission and of an existing item. I know...) so I feel that you can not have full marks here. The only thing holding this back is that final level of creativity. (Which is completely not applicable to this project. But there it is.)
Technique takes a bit of a hit because I think you can get the surface treatment for the blade MUCH MUCH smoother and as a result get the metallic look of the blade much more believable. Other then that I really like your technique and may well steal some of the processes you have shown here. Great stuff. I'd love to see you do another one where you do take the blade finish up to 600 grit sand paper in a wetland application to really get an amazing surface. You can also wax and buff the final result to get that really glossy auto body finish if it is applicable.
Impact doesn't get completely full marks because this is a WIP. I love that you have the final version shown but from a compositing standpoint there is something a bit disjointed about how you have set it up. Check out ArtyAMG's WIPs for some tutorials that are perhaps a bit better assembled. Not too much to improve here though.
All in all I really like the tutorial and piece. KUDOS!